|
Adding BLE to AirWhere. ( Android and Iphone FSH)
This page will help you add a BLE module to any current AirWhere setup. BLE can be used with an android Phone to LK8000 and XCSoar, an Iphone to FlySkyHy and even to another BLE module installed in a kobo. The ESP32 has built in Bluetooth but unfortunately due to the size of the code we are working with, the ble has issues.
Hopefully this will be sorted soon and we can supply a version with BLE.
Fortunately there is a very quick and cheap away around this -> we just need to solder on 4 wires to a BLE module. We recommend the HM-10 BLE module, these can be picked up from ebay for around £5 or contact us to purchase.
Required Knowledge & Equipment
AirWhere with GPS installed and operational. ( See build pages to choose the correct one for you. )
HM-10 BLE module.
If you purchase a genuine HM10, the system will work fine.
However there are lots of copies and fakes and most do not work! One cheap version we have found is a HM10 copy with firmware JDY09-4.3, please ask the seller if this is whats on the board before buying, alternatively get one from us.
Step One.
Firstly build your AirWhere setup as per the other build pages. Fully test the setup to make sure all is working ok through USB or Serial to make sure.
Now proceed to setting the BLE module up for your chosen hardware.
Step Two - ESP32
| 2.1 |
Follow the wiring diagram to setup the AirWhere BLE.
a breadboard can be used to temporarily check the system works ok, however soldering gives a better joint.
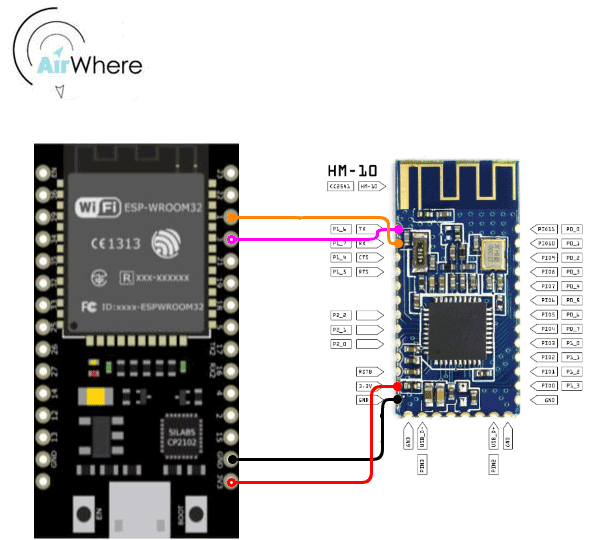
| ESP32 | HM-10 board |
| IO3 (RX) | TX |
| IO1 (TX) | RX |
| 3V3 | 3.3V |
| GND | GND |
The HM10 comes setup at 9600 baud so you need to set this in the AirWhere config ( kobo ( Serial/OTG ) Baud Rate ). If you want to use the faster 115200 that the ESP32 uses as standard then you will need to adjust the baud rate of the BLE board.
To change the baud rate you need to use a FTDI converter and then program the board using AT+BAUD8 .
However if you dont fancy doing this, let us know and we can send out a preprogrammed one for you.
Do not use the cheap JDY range of ble modules, these look like they are working but dont. They miss characters and jumble up the words.
|
Step Two - ESP8266
| 2.1 |
Follow the wiring diagram to setup the AirWhere BLE.
a breadboard can be used to temporarily check the system works ok, however soldering gives a better joint.
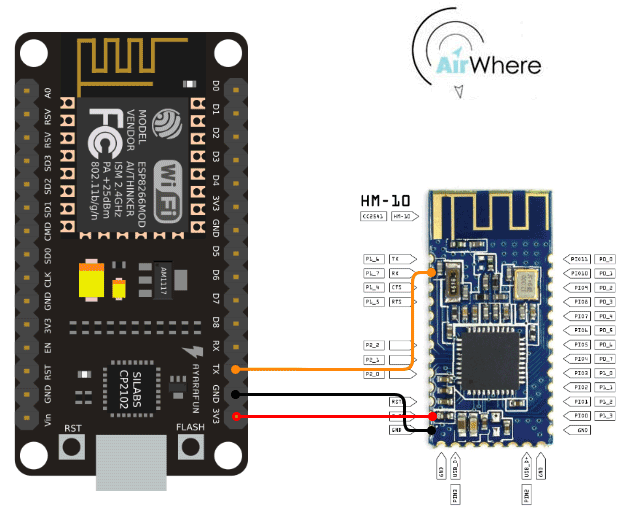
| ESP8266 | HM-10 board |
| TX | RX |
| 3V3 | 3.3V |
| GND | GND |
Please set AirWhere to OTG mode for this connection, this requires the GPS to be on 9600 Baud, as the HM-10 comes at 9600 baud, if your running a bluefly or any other speed GPS then you will require to change the baud rate of the HM-10. This info can be found on this page.
|
Step Three - Setup LK8000 / XCSoar / FlySkyHy
| 3.1 |
After the board has been soldered on, load your flight software.
Proceed to the device settings and then add a new device, the HM10 should pop up in the devices so you can just add in XCsoar - Bluetooth LE, and in LK8000, add the HM10 BLE device thats appears as a new Port.
For FlySkyHy
How to connect
To pair your vario with Flyskyhy, go into the Flyskyhy Settings menu (if you are completely new to Flyskyky: the menu bar comes up when you swipe upwards anywhere on the screen). Select Settings→Vario→Model. Select your vario model there, and the “Select an Accessory” popup will come up. Switch on your vario device, and it should show up in the popup after a while. Select it, and a connection will be established.
When you have done that once, the connection should be established automatically in the future, every time both Flyskyhy and the vario device are running.
For the FlyNet varios specifically, establish a bluetooth connection with the Settings App first before you try the above procedure.
|
Have fun with the project!
|
|
|